How to Play CPA Dating - How to play cpa dating? okay this time we will discuss about cpa which is recently very much discussed, CPA is an easy way to make dollars in this article we will specifically discuss CPA Dating because the process of getting cuang with this cpa model is very easy and we will discuss it thoroughly.
CPA dating is a cost per action model that specifically targets only niche dating or dating, basically we promote dating links from a network and if someone signs up then we will get paid dollars.
CPA is short for Cost Per Action, for the action itself there are several models, namely CPA, CPS, CPL later we will explain in more detail below, for the amount of payment we can receive varies depending on what offers we run.
Terms You Must Know about CPA Dating
There are several terms in cpa dating that you must know to go deeper into CPA, we will explain one by one in detail.
CPA Network
CPA Network is a company or organization that bridges between publishers (people who advertise CPA products) and advertisers (people who place advertisements to find action) CPA Network will pay us if the minimum balance is met.
This is more or less how the system works:
Advertiser: I need new members on my dating site for the US region.
Network: okay, how much do you pay per person who signs up?
Advertiser: for the US I'll pay $2 per signup.
Network: ready
Advertiser: The target I want is Americans aged 21 and over.
Network: good deal.
Advertiser: okay...
Then CPA Network will inform the publisher to advertise the offers desired by the advertiser.
CPA Offers
CPA Offers or offers, this is what we advertise or promote to be able to get paid, for this type there are several types in an offer, you must really pay attention to the offers that we will run because there are tos that we must comply with such as where our traffic sources come from, incentives or non-incentives.
Traffic Sources
There are several traffic sources that we can use to get conversions in CPA Dating, one of which is traffic sources from social media such as Facebook Instagram etc., there is also a paid traffic method but this method requires a lot of capital, we will discuss CPA methods and the necessary materials in the next few articles.
Steps to Play CPA Dating:
Steps to Join a CPA Dating Network
There are so many cpa networks, especially dating, for cpa network names such as iMonetizeit Clickdealer and lospollos, you must be very familiar with the name of the network, before you join a network, pursue the offers they offer, whether it matches the traffic sources that you can bring in or not.
Joining a CPA network is actually very easy, if you have mastered how to bring in traffic then when the interview makes the AM or affiliate manager really confident and confident in your ability to bring in traffic.
Tips for Choosing Cpa Offers
First to choose offers look for the easiest, there are 2 types of the easiest offer in my opinion in cpa dating the first is SOI (Single Op In).
This means that we are told to find people to register on a certain website without the need to confirm the registration email, the second is DOI (Double Opt In) which means we have to find people to register on an offer and the person verifies the email.
After getting good offers, then start bringing in traffic from social media or from paid traffic, for how to get traffic for cpa later we will also discuss it.
Overview of the CPA Method
CPA method traffic from facebook
Generally people who use Facebook as a source of traffic in CPA use Facebook spam techniques used to bring in visitors.
CPA Traffic Method from Instagram
Instagram method is almost the same technique as Facebook, we need a lot of Instagram accounts to promote existing link offers.
I am sure, your pages are not ranking in the top 10 of the search results. Why? Because, you don’t have enough high quality Backlinks for your pages. But you can increase your visibility by building high DA-PA and relevant backlinks to your web pages. You need good internal and external links to all of your pages. By building high-quality backlinks, your rank is sure going to boost. Here we are going to share 1000 Free Backlinks. It will greatly help to increase domain authority of your website.
If you are unable to list your site properly, then you can hire SEO services from our company. We have an SEO expert team to help you. Our company provide the cheapest SEO packages for creating Backlinks.
My Free Backlinks List
In the below
table, you will get all the Backlinks that I created. If you are unable
to add Backlinks to your site then let me know. I will update the
Backlinks. Now, check the all the below Backlinks and try to add it.
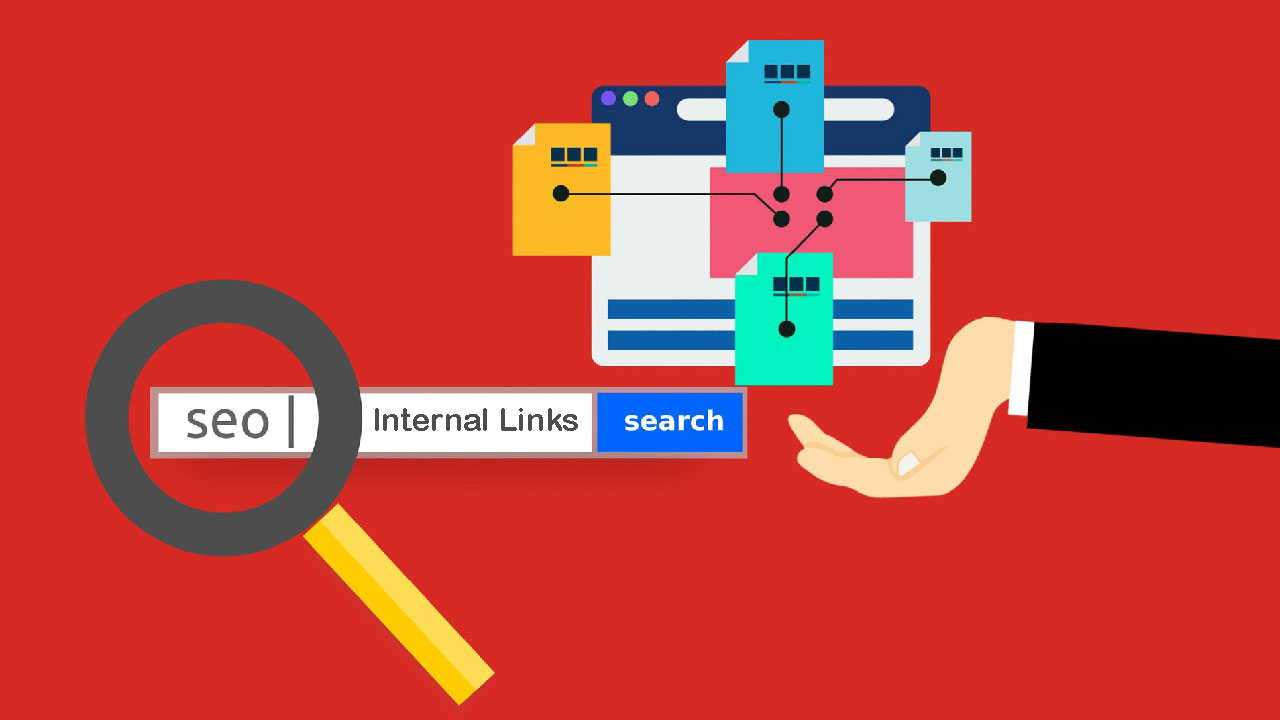
Internal links is one of the best on-page SEO factors in 2022. Website owners ignore this internal linking SEO while considering content optimization.
Internal Linking SEO 2022: Internal links are content king. Internal linking is one of the best on-page SEO (Search Engine Optimization) factors in 2022. But most of SEO manager and website owner ignore this while considering content optimization.
Google i.e. Search engine finds relevant contents from the link sources. Without links search engine does not work. If your webpage gets more links from somewhere on the web, it ranks better than those web pages that has comparatively less backlinks.
Did you know? Both your site visitors as well as search engines use links to find content on your website. The links are of three types internal links, external links and inbound links. Internal links helps Google to understand the structure of your website. It creates hierarchy on your site to increase authority (PageRank) of a post.
Every day user search millions of webpages with helpful information. Google uses software known as web crawlers to find and index webpages.
A search engine crawls websites by following links on web pages to discover new pages that have been made available on the web. Google bot collect information from across hundreds of billions of webpages and organize it in the Search index.
SEO internal links WordPress: Over 60 million people have created WordPress website for their online identity. I am sure that you are also using WordPress for your website. Am I right? Actually, most of newbies are not aware of best practice for Internal links SEO WordPress. I will discuss here the SEO internal links best practice for your WordPress.
Table of Contents
What is an internal linking with example? Types of Internal links
What are internal links and its benefits? Internal linking means linking from one page to another page on your website. That means the source domain and target domain are same. Internal links can help users and Google navigate your site better.
In my opinion, there are two types of internal linking viz. 1) Internal Links for Website and 2) Internal Links for Webpage. What? Yah! I think so.
Website Internal Links:
Internal links that creates trustworthiness and helps users to know more about your website is called website internal links. These links generally linked from every webpage on your website.
For example: Links to your Home page, About Us page, Contact Us page, Privacy policy page, advertise with us, career and Help pages, post feed, categories and tags etc.
You might notice drop-down menus of menu bar and navbar of any site. Menu bar provides site visitors a standard place to find main topics on your website that they might be interested in.
Webpage Internal Links:
Internal links that provides depth knowledge about specific term or topic used in your contents of a particular webpage is known as webpage internal links. Webpage internal links are commonly known as contextual links.
For Example: A link to my tutorial about “Post Title and SEO” from this article is an internal link, and a link to Search Console Help “Links Report” is an external link.
These links are useful to provide related content users want to find. Google also use these links to identify signals that can help determine which pages demonstrate expertise and authoritativeness on a given topic.
That means the more links a particular webpage receives, the more important it will seem to search engines. Therefore, you must internally link webpages of your site to boost page rank on SERPs (Search Engine Result Pages).
What is internal linking and external linking?
Linking to another site from your site is called external linking (outbound links) and it also known as backlinks for that another site. Whereas, linking to one page to another on your website itself is called internal linking.
In other words, internal links connect pages and posts on your own site and external links connect your pages with other websites.
How important is internal linking? Why Internal Links?
Internal links for SEO: Internal linking is an important on-page SEO factor in the eye of search engines including Google. But the question is why internal linking is so important? And where do we start?
As we know that the search engine follows links to discover content on the web and index them. Webpage getting more links creates signals that it’s an important and high-quality content. Google consider both internal and external links for ranking purpose.
As a site owner, you have full control over internal links. With the right internal links, you’ll guide your users and Google to your most relevant and quality content pages. Thus, you should follow best practices for internal linking and increase your ranking position on SERPs.
Content Relationships and Content SEO
Internal links build relationship between contents of your website. Content SEO includes a good relationship between webpages to derives more traffics. You can see this tutorial has been posted under organic traffic category and tagged with PageRank and SEO.
That means, I want to tell Google that this tutorial is related to that category and tags. In a similar way search engine recognize that all posts under that category and tags are related to each other.
Simply, you can say that Googlebot comes at the webpage of your site and starts finding other webpages with the first link you provided in that webpage. By following links search engine can understand the relationship between the various pages and posts with similar subject matter.
Link Value and Valuable Links
The more links a webpage gets, the higher the link value of that webpage. Google divides link value between all links on a webpage. Actually, the link value of any webpage will be shared between all the links (Internal and External) found on that particular webpage. The link value passed to the following web page will further be divided between the links on that webpage, and so on.
The homepage of any website has the highest link value compare to other web page because it has the most backlinks. Thus, Google will find your new blog posts faster if they’re linked to from the homepage of your site.
Therefore, your newest articles, tutorial or blog posts will get more link value if you link to them from the homepage, instead of linking only on category and tag pages.
Note that your internal links must be relevant for the webpage that links to another webpage. Only relevant links provides values to the linked webpages. Because Google believes a page that gets lots of valuable links as more important and that way you increase the chance of appearance on the top of PageRank.
How do I find internal links?
It is very interesting question. The answer is link of each and every webpage on your site is internal link. But more relevant query would be if you ask me that how to find related SEO internal link for current post.
Smart Way to find Relevant Internal Link for SEO
Suppose you are publishing a new blog post on your website. Now, you want to add internal links to that page. You have to use keyword (anchor text) of web pages that are performing well on SERPs. But, how do you find that webpage?
Step-1: Copy any relevant keyword or phrase (to be used as anchor text) from your current post. Suppose you are writing about Apple iPhone.
Step-2: Just go to google.com
Step-3: Use this Showeblogin SEO tricks to search for your keywords
site:YourDomain.com “Paste that keyword or phrase (Apple iPhone)”
Now, search engine shows you the top performing webpage of your site related to that keyword (Apple iPhone). Suppose Google returns 40 pages with that keyword. Pick up the top 5 pages from search results.
Step-4: Go to those pages and look for that keyword (Apple iPhone) and link to the new post from those webpages using the same anchor text.
This is how you will find best and high authoritative internal links for your current post. Similarly, you may link back to those pages from your recent post.
Just go to the list of published posts and search the keyword to be used as anchor text for internal linking. If you are using WordPress, you have to select your anchor text while writing your current post and click on link button on post editor and paste the URL of your recent post.
How many internal links is too many?
Too many internal links SEO: When you get the concept that links pass their link value on, you’ll understand that more links to a post mean more value. Internal links must be useful for your user and related to your content. On the other hand, if you link more web pages from current post, you are sharing less link value to those webpages.
Additionally, too many internal links might distract your users from the main topic that you want to explain in a post. It is also possible that the information for which user came to your website may stray from the content because he will click on the internal link and go to another page for which he did not come.
Back in 2009, Google says that up to 100 linked pages from your post might be considered as good links. Does it still relevant in 2023? Does Google automatically consider my site spam if my webpage has over 100 links? The answer is no, not at all. It is just 100 links guidelines.
Depending on various factors, a web page might have 100+ links. Those factors include the following:
Your content is long.
Each link is relevant for the webpage.
Every links creates value for your site users.
Good balance between internal and external links.
Real stuff on the page that may be defined on another page in detail.
Too many internal links are not good for both users and search engines. Tons of links make your site seem spammy and provides bad user experience and both factors affects content SEO rankings. That is why you link to another webpage only if it provides best user experience.
Note that you link a page two or more times from your post then it only counts as one link. That means you should count number of pages rather number of links on your web page.
Internal Linking Strategy in 2022 – SEO best Practice
An Actionable Guide for internal Links: Internal linking is ongoing process on a regular basis to evaluate and improve quality of your contents. Setting up an internal linking strategy in 2022 is very important. Contextual as well as product web page should have internal link to boost your ranking on SERPs.
Most of SEO newbies thinks that linking to pages internally on a site is very simple and they make mistake. Some other things it is very difficult and more complex to link one page to another of a website. Internal linking is both advanced and simple. The real fact is that you must have strategy and plan to execute and make more relevant contextual links.
I will provide you the guidance for best internal linking for SEO in 2022. To set up best internal linking strategy, there are several things to take into account. However, the following are the most recommended steps to be followed by a site owner or SEO manager to improve content marketing SEO through internal linking:
Publish more Contents
Perfect Site Structure
Use Canonical URL
Add contextual links
Use anchor text
Cornerstone Content
Related Post Section
Table of Contents
Show Breadcrumbs
Additional Tips on Internal Linking
Internal linking SEO best practices for your blog posts are as follows:
Publish More Contents:
The first step is to create lots of contents for your site. Publish more and more contents for your website.
Perfect Site Structure
SEO internal links to homepage: Ideal site structure is just like a pyramid. Homepage of your website is on the top and then categories, sub-categories and tags are there. At last there are posts/ blog (Articles/ Tutorials) and pages.
You should avoid internal links to the top-level page (Homepage) of your website. Don’t link to the pages that has already been linked from main navigation menu.
Use Canonical URL
While linking one page to another you should use canonical URL. Ignore short URL or redirect URLs. If your user accessing same content through multiple URLs then it hurt content SEO. However, you may use 301 redirect from non-preferred URLs to the dominant URL.
Add contextual links
Make internal links to related contents only. I recommend to use internal link directly in a sentence where keyword is related to the destination URL.
A user more likely to click on internal link that provides useful information. Accordingly, your site visitors spent more time on your website and improves user engagement.
Use anchor text and Alt text
Anchor text is the visible portion of a link to the user. In other words, it is the clickable text that that points to the destination URL. Use anchor text very precisely and naturally. Descriptive keywords and long-tail keywords should be used in anchor text.
However, you should avoid using lengthy anchor text just for search engines. Because, excessively keyword-filled will rank down your post on SERPs.
Using same anchor text for different URLs is bad for SEO. Google will be confused because it would thing that both URLs are on the exact same topic.
Alt text is used to specify alternative text to tell Google the nature or contents of an image. It makes image searchable. If you link a webpage of your site through image, your alt text will become clickable. Actually, alt text appears if image fails to load. So, if you are using an image for your post, please don’t forget to use alt text.
Cornerstone Content
Cornerstone contents are most important contents on your site. You should link internally to your cornerstone contents from maximum posts related to it. The more internal links to cornerstone contents, it gets more link value. I recommend to link it from navigation (Main Menu) of your site.
Remember one thing that your cornerstone (Most essential content) post must be complete and covering all aspect of the topic you are writing in the post. Your post may be minimum 1500-2000 words long.
Related Post Section
This is the best practice to show 2-4 related articles at the bottom of your current post manually. However, there are many WordPress plugins available that add related posts from the same category or tags used in your current post. Some WordPress themes also supports related contents to be inserted between contents of a post or have option to show before/after specific paragraph.
Table of Contents
While internally connecting posts on the same domain, you should also provide your user a table of contents within your posts. Table of contents (Index) will help both users as well as search engine to understand the hierarchy of your web page. Many WordPress plugins are freely available for this feature. It simply provides a table to show all sections or headings (H2, H3, H4) in a post on the top of your post.
Show Breadcrumbs
A breadcrumb is a row of internal links that allows live visitors to quickly navigate back to a previous section or the root webpage. You may show breadcrumbs at the top or bottom of content.
I recommend you to show breadcrumbs just above the post title. Breadcrumbs includes taxonomies like categories and tags. If you are a blogger then it is essential to add internal links to the taxonomies the post belongs to. It helps Google to understand the structure of your blog.
Additional Tips on Internal Linking SEO
Top Page Internal Links: Try to add 1-2 internal link within first or second paragraph of your article. If you add internal link at the top of your content then users may click on that link and spent more time on your site and reduce bounce rate.
Internal Links Audit: Audit your site for internal links using Google Search Console. The Google Search Console has a unique feature to see all internal and external links of your site. If you have not submitted xml sitemap to search console then, I strongly recommend you to submit it today. Otherwise, you may provide a link of yourdomain.com/sitemap.xml to footer of your website.
Broken Internal Links: Your website may have broken internal links. So, find those broken links and fix them. You either remove that broken links or update with new webpage URL or redirect them to a new page of your site. There are many online tools available free to check your site broken links.
Unimportant Internal Links: Some webpages are internally linked but not so important. You may remove that insignificant internal links to save link juice. And now link to important page to pass link value to that page so that it performs better in SEO ranking.
Link from Old Articles: The secret tips for content SEO is linking your new post from old posts. These internal links pass link juice from old authoritative webpage to your new article and make your new content fly on the top of search results page. Additionally, it also asks Google to re-crawl your old contents.
Bad Internal Linking – Don’t do
Multiple Links for Same URL
Don’t add same page links twice or more on the same page. If it necessary to link the same URL more than once on your page then first link should be taken into account for URL Rating (UR) or link value. Google looks the first link and ignore the other multiple links to the same URL.
rel=”nofollow” for Internal Link
You should not use rel value “nofollow” to prevent Google from following a link to a webpage on your own website. If you want search engine not to follow an internal link then use the robots.txt Disallow rule. Note that Blogger or Wix user might not need to create or edit a robots.txt file.
You may use noindex tag which prevent search engine to index your post. Google will not show your noindex articles on search results.
Avoid Automation
SEO internal links plugin: Please don’t use plugins or tools for internal link automation. Auto internal links may not be relevant for users and they might not click on that auto generated internal link.
Plugin shall create lots of internal links with the same targeted keywords as anchor text that looks like spam for search engine. Therefore, you should avoid automation of internal linking contents.
Google AdSense Approval Process 2022: New Blog or WordPress Site
AdSense Account Approval Process 2022:Sign-up,
connect site to AdSense, enter payment address details, verify phone
number and get fully activated Google AdSense account within a day for
your new blog.
Each and every people in the world wants to monetize their precious
time with the help of various resources either offline or online.
If we talk about making money online then not a single person deny
the fact that Google AdSense program is one of the best resource for
earning handsome money from your blogs, responsive websites or AMP
implemented sites, Mobile friendly sites, Games, YouTube Videos and even
on site search result pages etc.
Did you know? It was June 18, 2003 when Google launched advertising
monetization program named Google AdSense which has now grown to include
over 38 million websites in the year 2022.
Google
AdSense revenue share is 68% of contextual ads displayed on website of
publishers. For example, if Google’s auction of ad inventory on your
site generates monthly average of $10000 then you will receive $6800 through Google AdSense 68% revenue share.
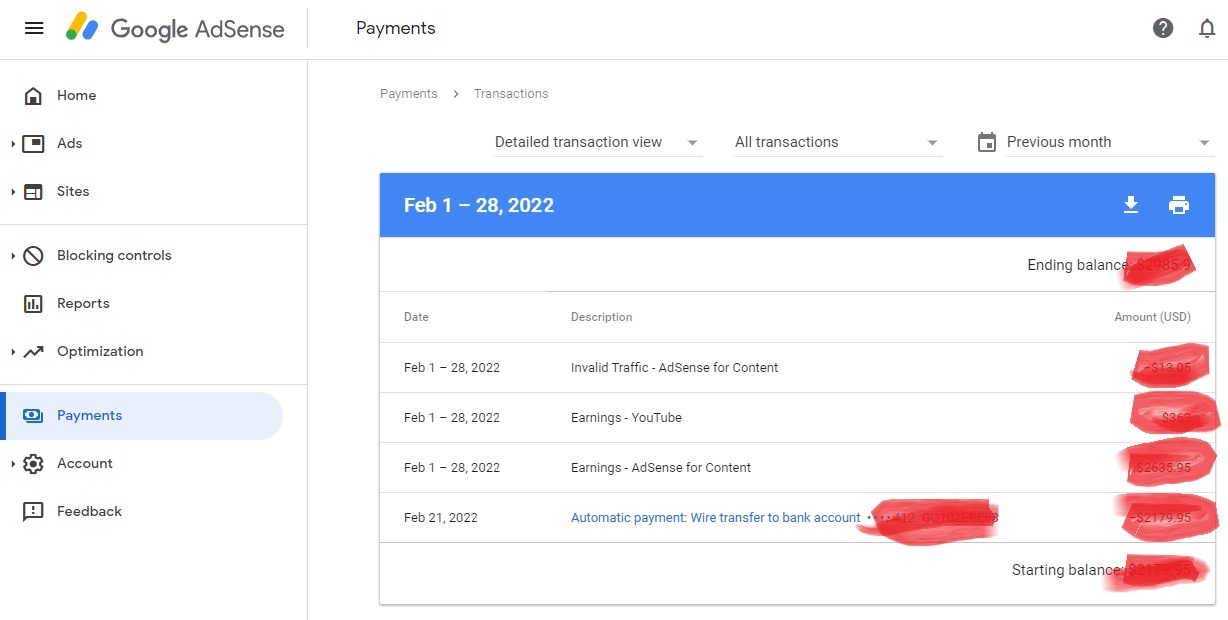
Here is the screenshot of AdSense earning proof for automatic payment
made by Google through wire transfer to my bank account on February 21, 2022.
AdSense Payment Proof
On 21st day of each Month: After reaching threshold limit ($100), you will get an email from Google Payment (payments-noreply@google.com) with title Google AdSense: Check your recent payment.
Now, come to the point that how to get Google AdSense Approval for
your newly created free blogger blog or WordPress website. Well! This is
one of the frequently asked questions by our readers that why their
application get rejected for Google AdSense.
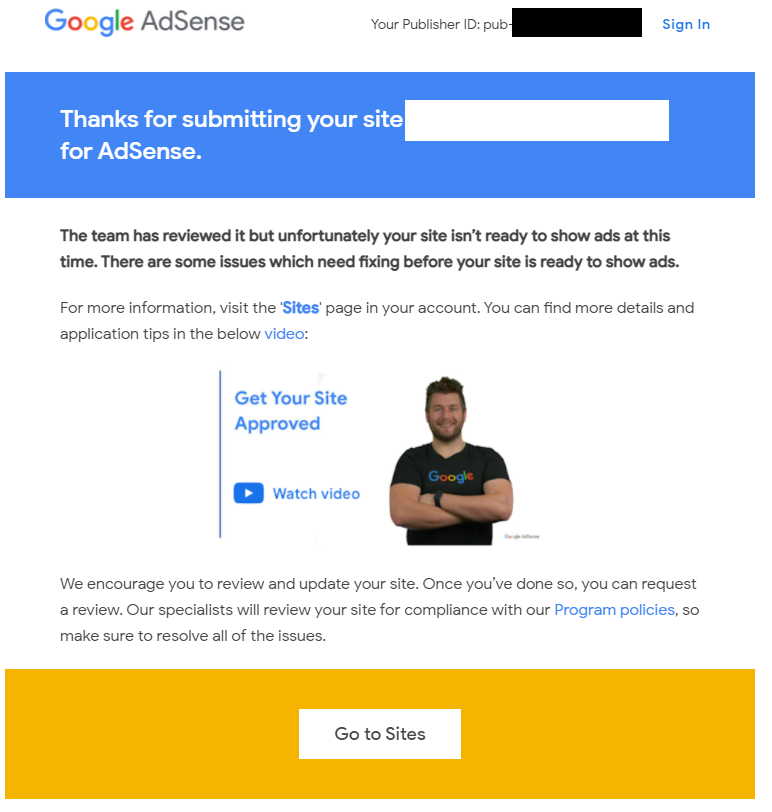
Here is the extract of Email received from adsense-noreply@google.com by applicant for the subject – “Your AdSense application status”:-
“Thank
you for your interest in Google AdSense. Unfortunately, after reviewing
your application, we’re unable to accept you into AdSense at this time.”
OR
If someone is already earning from YouTube videos, they may get email like this:-
“Thank
you for your interest in expanding your Google AdSense account to
implement ad code on your own website. Unfortunately, after reviewing
your application, we’re unable to approve this application for the time
being. Your existing AdSense account that allows you to show ads on
partner sites is not affected by this disapproval.”
OR
The team has
reviewed it but unfortunately your site isn’t ready to show ads at this
time. There are some issues which need fixing before your site is ready
to show ads.
Site not ready for AdSense
Are you searching for how to get AdSense approval for WordPress blog? Are you applying for the first time in 2022 for AdSense programme? Are worried before making first application for Google AdSense?
Is your site ready for creating an AdSense account? Here under, I am explaining in detail the frequently asked questions.
Table of Contents
Most of the common reasons/issues for disapproval are:
Your site has to be completely original. Following are the top three
reasons, your Google AdSense account might not be fully activated in the
year 2022:
Insufficient content (as explained in later para);
If you are one of those applicants whose AdSense application has been
rejected again and again then please ask from yourself only one
question:-
Why Should Someone visit your Site First?
Your website should provide a significant value to the users and it
must give them a reason to find it first when searching for topics
covered by your website.
After answering the above question from yourself, I am sure you would
get your approved AdSense account. The good news is that now you will
be able to immediate access to your AdSense account once you sign up.
Is new website AdSense approval always says no content?
Not at all! in fact your new website will get
approval in first attempt if you have written engaging content with
great user experience. AdSense always welcome new site with fresh
contents and therefore, you should ignore copyright
contents or links to such contents i.e. never links to other sites that
are hosting copyrighted materials without authorization.
Insufficient content or no content is one of the main reason for
disapproval of AdSense account in 2022. If you own a new site, please
make sure you have high quality new contents (discussed below in detail)
before applying for Google AdSense monetization programme.
Get Google AdSense Approval in 1 Minute
AdSense Approval within Minute: If someone assure
you that they got AdSense approved account within a minute then you
should know the fact behind that activation.
Google allows you to connect your site to AdSense immediately after
sign up. That does not mean that your account has been approved.
Actually, you need to activate your AdSense account so you can show ads on your site and earn money.
Before final activation, your AdSense account homepage has a list of tasks to complete:
Connect your website to AdSense Account;
Enter your payment address details; and
Verify your phone number (Not required in all countries).
After you complete each task, click Done or Submit.
Now, Google AdSense Team review your entire site to check it complies with the AdSense Program policies and email you within 24 hours for the status of your account.
When your account is fully activated, you can set up ads on your site
and start earning money by displaying contextual ads. The entire
process usually takes a single day, but in some cases can take up to 2
weeks.
Google AdSense Account Approval Process in 2022
Google has now made signing up process more faster and easier for AdSense with effect from Thursday, October 08, 2015. First check whether your website is compliant with the AdSense program policies and then Sign up for AdSense Account.
Google AdSense approval trick 2022: If you ask me for AdSense account approval in 2022, the following quick steps will help you to understand the whole process:
Setup your website or blog;
Get organic traffic from original high quality contents;
Comply with the AdSense Program policies;
Sign up for an Google AdSense account;
Add the AdSense code to your site; and
Wait for maximum 7 working days for final review & approval status.
Is it hard to get AdSense approval?
Google AdSense account approval is very
easy in 2022. You can get AdSense approval within 24 hours. Set up your
AdSense account if you own websites/ blogs or forums. If you are a new
blogger or have a new site then please go through detail recommended
personal guidelines, I have discussed below.
Note that news websites or forums gets quick AdSense approval as they
publish more contents in compare to personal blogs or websites. If you
are new blogger or have own brand new site, please read the complete
detail about how to apply for AdSense Program in 2022.
How can I get AdSense approval fast?
Professional Experience to get AdSense approval very fast in 2022: Your website shall be eligible for getting fast AdSense account approval only if it fulfill these three conditions:
Best user experience: Loading, interactivity, and visual stability represented by Core Web Vitals.
High quality content: It doesn’t mean lengthy post but your webpage should provide to users what they are looking for.
Micro niche site: Apply your expertise and experiences for publishing unique information using Long-tail keywords.
How to Apply for Google AdSense Program: Complete Detail
Eligibility Requirement for AdSense in 2022: For
Google AdSense approval, you need to satisfy specific official
requirement and some unofficial tricks (Personal experience).
Actually, there are some basic requirement for being eligible to
participate in AdSense online program which has been briefly discussed
hereunder:
A) Google Account:
I know that most of you have already Gmail account and if you haven’t then please create a free Google account
needed to sign in to AdSense. All information regarding acceptance,
rejection, payments etc. in relation to AdSense will be mailed to your
Gmail account by Google AdSense Team.
You should always be careful while providing your personal details at
the time of creating a new Google Account. This is because if you will
provide wrong information like Full Name, Age and Address etc. then your
application might be rejected by AdSense team.
B) Age Requirement:
In accordance with the AdSense Terms and Conditions, applicants must be at least 18 years
of age. Thus, if you are not 18 years old then you will not be able to
participate in Google AdSense irrespective of satisfying all other
conditions.
In that case there is a simple trick that you may provide your
parents or guardian name instead of yours at the time of making
application (see the procedure below) while signing up for AdSense
Program.
C) Blog or Website:
Yes! AdSense will make your online contents profitable. If you are
running your own website then it’s OK. Otherwise you may either make a free Blog with Blogger.com or create a website to monetize the contents on your Blogger Blogs or Websites.
However, if you have multiple websites then please provide the
address (URL) of your best site which comply all conditions mentioned as
under.
Website/Blog Ownership:
It is compulsory to have your own site or blog so that you can access
the HTML source code to place the AdSense Ad Units code which displays
Ads on your site. Otherwise your AdSense account shall not be approved
on final review made by AdSense team.
It is not mandatory that you must have a custom domain for your blogger blog but I strongly recommend you to purchase a domain preferably top level domain like aubsp.com, and example.net etc. for your BlogSpot.com blogs.
Website/Blog Contents:
Think as an advertiser’s point of view that why you will go for a
site which has not quality contents. Remind one thing that AdSense works
by crawling the contents of each and every single webpages on your
blog/site.
1. Post Quality
I mean every webpage contain enough textual contents to complete the
whole story and topic you are willing to spread online. This will make
happy to your blog readers because they gets complete information and
answer for which they have visited your site.
Note that you may not fix the length of any post which results
quality contents for Google AdSense. However, I personally opines that
an article written within 800-1000 words (Standard Quality) is more than enough instead of writing too short post (Low Quality) with just 250-300 words.
If your post have more than 1000 words (High Quality), it might be preferred by users to get complete information about the topic of your webpage.
2. Post Quantity
If you want to get one short approval for AdSense program then please
make sure you post at least 3-5 posts on weekly basis unless and until
your blog/site get approved by AdSense Team.
If possible, you should publish a high quality content on daily basis to generate good amount of traffics to your site from organic keyword search results.
Google has not specified any magic number of posts to be required for
AdSense approval. But, in my opinion if your blog have more than 50
good quality and user engaging articles then your blog is ready for
applying for AdSense.
It is the quality and not the quantity of your blog posts which
AdSense team consider at the time of reviewing your blog/site for
AdSense approval.
3. Insufficient content
Your webpages should have sufficient text, I mean to say maximum text
with complete sentences and paragraphs, not only headlines. This is
because if your site contain mostly images and videos then your
application will not be approved.
4. Original Contents
Your site contents must be original and not a copy paste from other
website/blog or anywhere else. Therefore, you should not use copyrighted
material in any manner on your site. If you are using any copyrighted
textual contents, images, videos etc. then it violate AdSense content policy.
Some webmasters uses images for their posts either from Search Engine
Result Pages (SERPS) or other sites without permission from original
owner or showing credit to them. You may use royalty free stock for your
site.
5. Regularly Updated Contents
Suppose someone has posted 50 posts in a single day or week to get
approved for AdSense and thereafter not posted a single post within week
or even a month.
Thus, please keep updating/posting on your blog on regular basis so
that your approved AdSense Account will not disapprove or disable within
a short span of time. Many of AdSense publishers get their fully
activated account disabled after few months.
6. Create About Us Page
Most of new bloggers not create about us page. They don’t actually
want to show their visitors about himself and the man working behind the
website. This is one of the reason their AdSense account not approved
by Google AdSense team.
Hence, you must create a page which should includes the information
about your website niche and the team working for your site. If you
manage your site, tell about yourself and what your visitors will get on
your site.
When Google AdSense team reviewing your blog, they want to know the
people behind the website. Creating “about us” page will validate the
fact that you are a legitimate business.
7. Create Contact Page
Never forget to create “Contact Us” page on your site. It not only
helps your site users to reach out to you but also ensure Google AdSense
team that you are genuine person and your site is not a spamming one.
8. Privacy Policy Page
Either you have not created privacy policy page or you might not have included the required information.
Did you know? Google uses cookies to help serving personalized Ads
for users of AdSense approved sites. Therefore, Google have provided specific information to be included in AdSense publisher’s privacy page.
Accordingly, your privacy policy should include the following information:
Third party vendors, including Google, use cookies to serve ads
based on a user’s prior visits to your website or other websites.
Google’s
use of advertising cookies enables it and its partners to serve ads to
your users based on their visit to your sites and/or other sites on the
Internet.
Users may opt out of personalized advertising by visiting Ads Settings.
Website/Blog Age:
Domain Age Requirement: To ensure the quality
contents and keeping in mind the interest of Google Advertisers, Google
AdSense has specified that the Indian and Chinese AdSense Publishers
required to have owned their sites for at least 6 months. Accordingly,
except India and China, there is no any minimum age obligation for
either blogger blog or website to participate in Google AdSense Program.
However, you have to ensure that your website is live and not in a
beta mode or under construction phase before you apply for AdSense
Program. Thus, placing ad code on a website which is not fully launched
or only consist a website template/them will not get final approval.
Irrespective of your country, I strongly recommend you to wait at least for 180 days after buying a domain or setup your self hosted site.
Website/Blog Language:
You may write your site or BlogSpot.com blog in so many languages.
However, AdSense Program is not available for all languages including
Afrikaans, Irish, Latin, Bengali, Gujarati, Panjabi, Telugu etc. and
therefore the primary language of your site must be in the AdSense supported languages.
Traffic sources:
Your blog/site traffics must come from the genuine sources. In other
words, if you got the visitors through Search Engines, Social media and
feed subscribers then it is good for the AdSense approval.
But, if you send bulk SMS, Email with your site links or asked your
friends/relatives/students at large to daily visit your blog without any
interest then it will impact badly on your site.
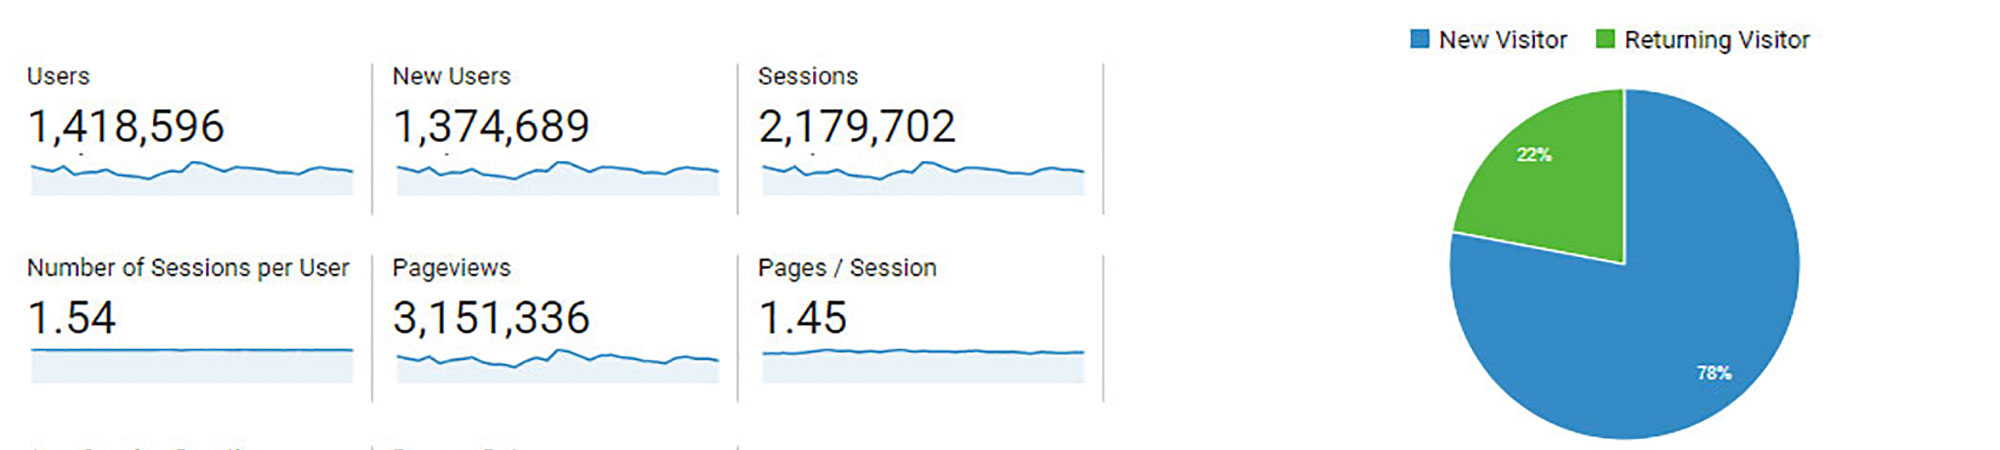
I strongly recommend you to sign in to Google Analytics and Webmaster tools which help you to understand your blog/site contents, live visitors, unique page views, and traffic sources in dynamic ways.
SEO Traffic – Organic
How much traffic required for AdSense approval?
Let me clear that AdSense has not specifically mentioned about requirement of traffic for approval.
But, if your website is not receiving at least 125-200 unique
visitors per day (i.e. 250-400 pageviews per day) then please wait for
some time to get more organic traffics on your site and then apply.
Note that you have to earn at least $100 to receive AdSense income into your bank account. Suppose your website receive zero AdSense Ad click
within a month. So, I am calculating AdSense earnings depending on
Active View cost-per-thousand impressions (Active View CPM) bidding.
On an average, I receive lowest active view CPM of $1 from 5000 page views.
Here is the calculation for getting your first $100 AdSense revenue payout:
$105 = At least $3.5 Daily AdSense Earning X 30 = 5000×3.5×30 = 525000 Pageviews per month.
D) Non-Google Ads:
You are free to use any third party advertisements on the same blog
or webpage for which you are going to apply AdSense Program. In other
words, there is no restriction to display Google Ads on your blog having
Ads from Media.net, Adversal, BuySellAds, Clicksor, Chitika, Amazon Associates etc.
However, you should make sure that your site does not contain many
third party advertisements. This is because your site will looks like
advertisement based rather contents based and that type of website does
not qualify for AdSense.
E) Apply for AdSense Program:
Now, you are ready to Sign up for AdSense Program. There are two-step application approval process under AdSense program.
Sign-up and Connect to AdSense:
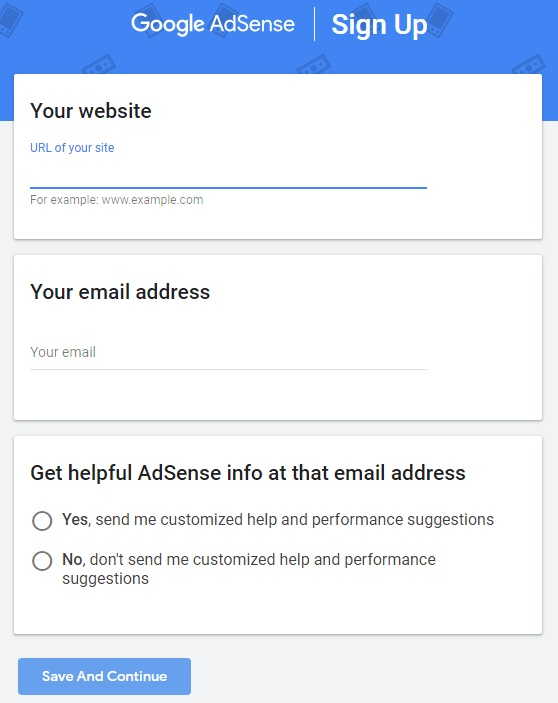
Create an AdSense Account: You may sign up for AdSense account and get instant access to your AdSense account.
AdSense Sign Up
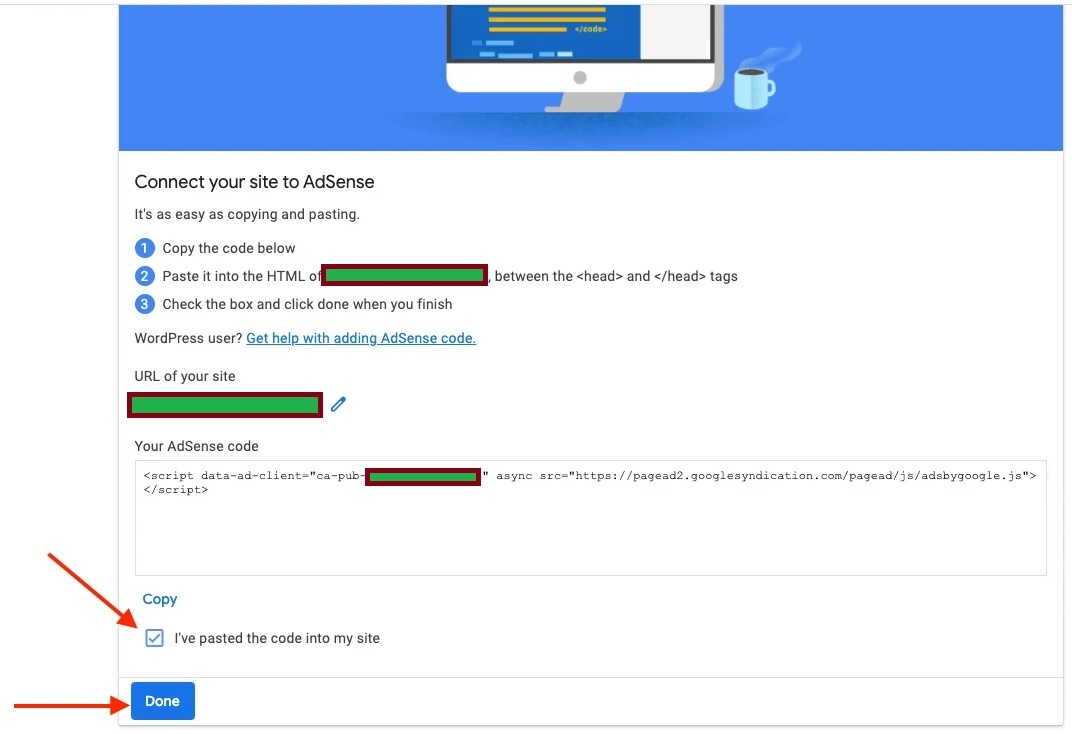
After log in to your AdSense account, you have to connect your site to AdSense by placing code into HTML of your site between the <head> and </head> tags.
The above code contains your Publisher ID (ca-pub-xxxx) to verify your site ownership and displaying ads automatically immediately after activation of your account (If you select the option to show the same).
See the screenshot for more.
Connect Site to AdSense
If you are not able to paste the code into your site, please feel free to ask me for help without paying consultancy fee.
Thereafter, you need to provide your full postal address along with
valid phone number. Note that Google AdSense team send Personal
Identification Number (PIN) to that address before sending your first AdSense payment.
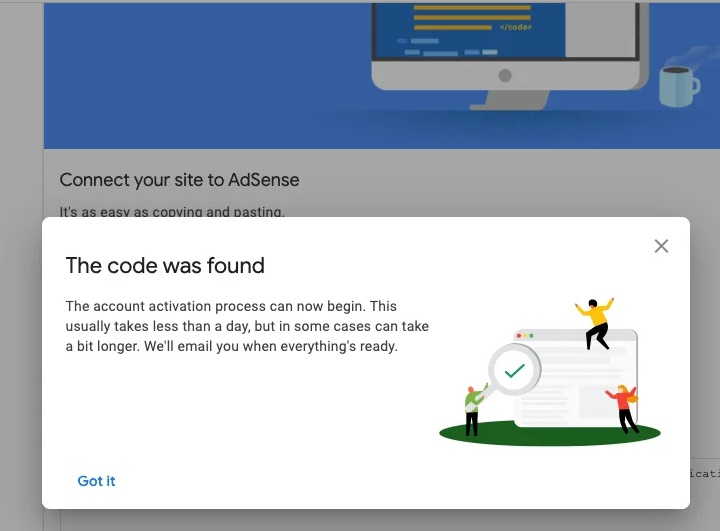
After, completing all steps, you will see the following pop-up message (Code was found):
“The account activation process
can now begin. This usually takes less than a day, but in some cases can
take a bit longer. We’ll email you when everything’s ready.”
The code was found – Connect site to AdSense
AdSense Account Activation
Note that this will not display any Ads on your live webpage until you get fully approved AdSense account. Earlier,
you would have to wait for some days or weeks for the preliminary
checks to verify the information provided at the time of submitting your
AdSense application. And after verification of your information (Your
Name, Address and Blog/site URL etc.) , you were able to create your
first AdSense Ad Unit.
Final Activation/ Approval:
Finally, you will get response within 24 hours from specialists of Google AdSense Team regarding the final status of your application after you add the code to your site.
However, this process may takes 1-2 days. Did you know? Previously,
the same process was completed after 7-10 days. Finally, you will
receive an email letting you know that your AdSense account has been
approved.
Otherwise, you’ll receive an email on your registered Email ID
explaining the disapproval reason and the possible next steps that you
can take to get approved account.
Once you got fully activated AdSense account, the Google Ads appears on your approved website/blog and the red bar across the top of AdSense Account will disappear. You may create your first Ad Unit to display AdSense Ads at the place you decide on your site viz. Header, Sidebar, above/below the contents and footer.
Is it necessary to give my bank detail during creating Google AdSense account may I add my payment method later?
No, there is no need to provide your bank account detail while sign up
for AdSense account. You may add bank detail after approval of AdSense
account.
Google AdSense pays you if your total monthly earning is at least $100.00 (check your payout threshold).
Once your earning reach the threshold limit, you may provide your
payment detail by managing payment method like wire transfer,
Intermediary bank (ask your bank) or FFC or FBO (ask your bank) etc.
How long does it take for AdSense to approve?
Waiting time for a fully activated AdSense account:
AdSense Account will be approved within 24 hours. Sometimes it takes
upto two weeks for approval. Actually, the time it takes to get approved
depends on factors like number of applications Google received and you
have not connected your your site to AdSense as we have discussed in the
sign-up process above.
Never forget to place the AdSense code on a page that gets regular
views. Note that some parts of the process require actions on your end,
and Google can only activate your account after you complete them.
Add AdSense code into Self-hosted WordPress
The most easy way to add AdSense code into WordPress (WP) is using WP
Plugins. If you have technical knowledge, you may also use Theme Editor option from the left navigation sidebar under Appearance after login to your self-hosted WordPress blog.
Further, you may check that whether your installed WP theme supports
AdSense code widgets. Most of theme comes with lots of option to insert
AdSense code into different parts of your site including Header,
Sidebar, Single page and Footer area.
Add AdSense code into Blogger.com
To add AdSense code into your blogger blog, just go to your blogger dashboard and from sidebar click on Theme, Thereafter, select Edit HTML from drop down menu of CUSTOMIZE button.
Now, paste your AdSense code just above closing head tag.
Add AdSense code into Shopify Store
If your store is on Shopify, you may insert the AdSense code there
also. Open the Embed Options modal on your published app page. Many
options are available to insert your ad code such as:
Embed in the Header;
Embed on the Homepage;
Embed on a Product or Collection Page;
Embed on a Single Page or Post;
Embed in Every Page; and
Embed in the Footer.
Today I will show you the option for adding the code in Header section.
Log on to the Shopify Dashboard section. Click on Themes from left sidebar and then select Edit code from the drop-down option of Action button.
Thereafter, navigate directly or find the header.liquid file and paste your AdSense code there and finally click Save button from the top right corner.
Recently, one of our client
got an approved AdSense account for his first blog.

